How to customize Android UI
1 Sep 2015
android programming development UI UXIn this post I will walk you through how to achieve customization of various Android UI elements. For those not interested in reading through this, all the code can be found on GitHub. For everyone else let’s get started applying our own theme to our app!
So let’s go ahead and open up Android studio and create a new Android project. Let’s go ahead and select a Blank Activity and we can keep the default name of MainActivity for this activity. Now we’re ready to start getting our app customized!
Android has come a long way in terms of its look and feel. Unfortunately, though it’s not as easy to completely get your app’s UI components to match the theme of your app. With iOS you could simply chose the font you wanted for a label from a dropdown. Android doesn’t make this as simple. For example, if you want to use a custom font for your TextView you would have to create the TextView in the layout file, get a reference to that component by its ID then load your font into a TypeFace and apply the Typeface to your TextView reference. Let’s walk through how we would do that with a specific example.
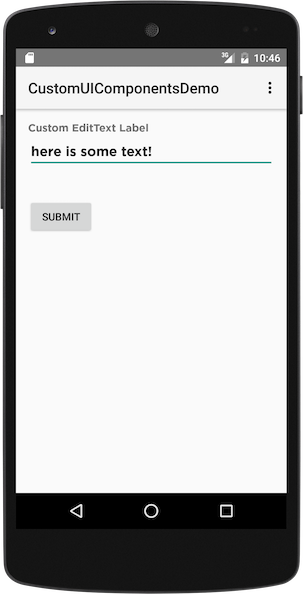
Here’s our layout for our MainActivity and below the layout XML we have a screenshot of what the app looks like. Go ahead and copy and paste this into your activity_mail.xml. We are setting up a RelativeLayout with three components. A TextView, an EditText component and a Button. Pretty simple interface.
<RelativeLayout xmlns:android="http://schemas.android.com/apk/res/android"
    xmlns:tools="http://schemas.android.com/tools" android:layout_width="match_parent"
    android:layout_height="match_parent" android:paddingLeft="@dimen/activity_horizontal_margin"
    android:paddingRight="@dimen/activity_horizontal_margin"
    android:paddingTop="@dimen/activity_vertical_margin"
    android:paddingBottom="@dimen/activity_vertical_margin" tools:context=".MainActivity">

    <TextView android:id="@+id/myTextView"
        android:text="@string/label"
        android:layout_width="wrap_content"
        android:layout_height="wrap_content" />

    <EditText
        android:id="@+id/myEditTextView"
        android:layout_width="fill_parent"
        android:layout_height="wrap_content"
        android:layout_below="@+id/myTextView"/>

    <Button
        android:id="@+id/button"
        android:layout_width="wrap_content"
        android:layout_height="wrap_content"
        android:text="Submit"
        android:layout_below="@+id/myEditTextView"
        android:layout_alignParentStart="true"
        android:layout_marginTop="40dp" />

</RelativeLayout>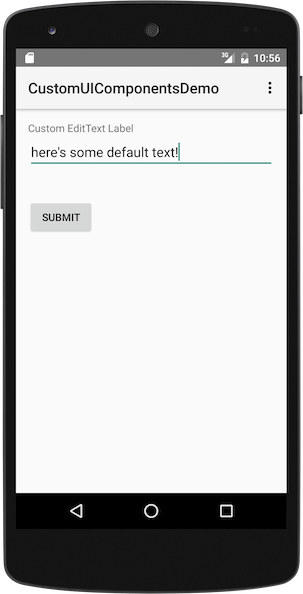
Now we can update our MainActivity.java but adding to our onCreate method the following code. With the following code we are going to create a Typeface with our font. Then we are going to apply that Typeface to our TextView. This will allow the TextView to appear with the Gotham-Bold font.
protected void onCreate(Bundle savedInstanceState) {

	super.onCreate(savedInstanceState);
	setContentView(R.layout.activity_layout);

	Typeface customTypeface = Typeface.createFromAsset(getAssets(), "fonts/Gotham-Bold.otf");

	TextView mTextView;
	mTextView = (TextView) findViewById(R.id.myTextView);
	mTextView.setTypeface(customTypeface);
...
}
In this example, you can see that in the activity’s onCreate(Bundle savedInstanceState) method we set the content view and from the loaded view layout we get a reference to the TextView with identifier myTextView.
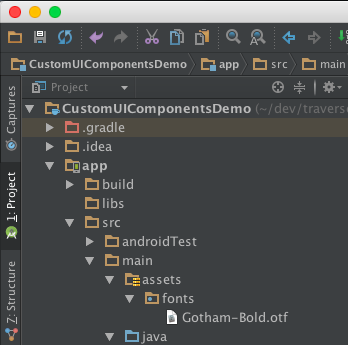
The next step is to create a Typeface object with the font you want to use. I’m using the Gotham-Bold.otf font file, but you would replace with your own font file along with the correct path to said font file if you wanted to create a different directory to keep your font assets in. In my case, under all my font’s can be found in the newly created assets directory where I have a sub-folder named fonts
In the final step we call setTypeface on the desired TextView object and we now have a label with our custom font. Check out the screenshot below to see what this code will generate in the app. Pretty cool huh? We can do the same with an EditText:
protected void onCreate(Bundle savedInstanceState) {

	super.onCreate(savedInstanceState);
	setContentView(R.layout.activity_layout);

	Typeface customTypeface = Typeface.createFromAsset(getAssets(), "fonts/Gotham-Bold.otf");

	TextView mTextView;
	mTextView = (TextView) findViewById(R.id.myTextView);
	mTextView.setTypeface(customTypeface);

	EditText mEditTextView;
	mEditTextView = (EditText) findViewById(R.id.myEditTextView);
	mEditTextView.setTypeface(customTypeface);

...
}
This is a quick and dirty way of doing it. It’s effective sure but having to create a reference to each TextView, EditText, Button, etc. generates a lot of the same code. Wouldn’t it be nice to have this code in one place that is called every time you create a layout with a your custom UI component class? If only that could be done. Wait… it can!
Before we get into the nitty gritty add the following class to your project. It’s main function is to load a font from the font’s folder of your app’s assets directory. Just to avoid loading and reloading the same font into memory over and over again as you begin to use it.
package traversoft.com.customuicomponentsdemo;

import android.content.Context;
import android.graphics.Typeface;
import java.util.Hashtable;

public class TypefaceManager {

    private static final Hashtable<String, Typeface> cache = new Hashtable<String, Typeface>();

    public static Typeface get(Context context, String name) {

        synchronized(cache) {

            if (!cache.containsKey(name)) {

                Typeface t = Typeface.createFromAsset(context.getAssets(), String.format("fonts/%s.otf", name));
                cache.put(name, t);
            }
            return cache.get(name);
        }
    }

}
Now let’s create a new java file in your project and call it PositiveActionButton.java. Here we’ll create a custom class that extends Button to set the typeface, set the background color, the button font color and set the default font size.
package traversoft.com.customuicomponentsdemo;

import android.content.Context;
import android.util.AttributeSet;
import android.widget.Button;

public class PositiveActionButton extends Button {

    Context mContext;
    public PositiveActionButton(Context context, AttributeSet attrs, int defStyle) {

        super(context, attrs, defStyle);
        mContext = context;
        init();
    }

    public PositiveActionButton(Context context, AttributeSet attrs) {

        super(context, attrs);
        mContext = context;
        init();
    }

    public PositiveActionButton(Context context) {

        super(context);
        mContext = context;
        init();
    }

    private void init() {

        setTypeface(TypefaceManager.get(mContext, "Gotham-Bold"));
        setTextColor(mContext.getColor(R.color.white));				// Feel free to use any color you like here
        setBackgroundColor(mContext.getColor(R.color.light_blue));  // Feel free to use any color you like here
        setTextSize(19.f);
    }
}
We just need to update our activity_main.xml layout to leverage this new UI component. Here’s the listing below. We’ve replaced the
<RelativeLayout xmlns:android="http://schemas.android.com/apk/res/android"
xmlns:tools="http://schemas.android.com/tools" android:layout_width="match_parent"
android:layout_height="match_parent" android:paddingLeft="@dimen/activity_horizontal_margin"
android:paddingRight="@dimen/activity_horizontal_margin"
android:paddingTop="@dimen/activity_vertical_margin"
android:paddingBottom="@dimen/activity_vertical_margin" tools:context=".MainActivity">
<TextView android:id="@+id/myTextView"
android:text="@string/label"
android:layout_width="wrap_content"
android:layout_height="wrap_content" />
<EditText
android:id="@+id/myEditTextView"
android:layout_width="fill_parent"
android:layout_height="wrap_content"
android:layout_below="@+id/myTextView"/>
<traversoft.com.customuicomponentsdemo.PositiveActionButton
android:id="@+id/button"
android:layout_width="wrap_content"
android:layout_height="wrap_content"
android:text="Submit"
android:layout_below="@+id/myEditTextView"
android:layout_alignParentStart="true"
android:layout_marginTop="40dp" />
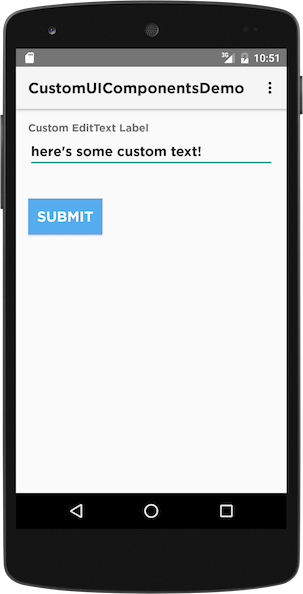
</RelativeLayout>Here’s what you should be seeing so far. Custom EditText and TextView fonts and a custom light blue button with large white text.

Looking pretty good right. Except we have that ugly default font in our ActivityBar. No offense Google, but that just doesn’t match the app anymore. So let’s update that font to match what we have for our custom Button, EditText and TextView. Let’s go ahead and create a new Java file in our package that we’ll call CustomTypefaceSpan.java. Here’s the code we’ll use in this class
package traversoft.com.customuicomponentsdemo;

import android.content.Context;
import android.graphics.Paint;
import android.graphics.Typeface;
import android.text.TextPaint;
import android.text.style.TypefaceSpan;

public class CustomTypefaceSpan extends TypefaceSpan {

    private final Typeface newType;

    public CustomTypefaceSpan(Context context, String family) {

        super(family);

        Typeface typeface = Typeface.createFromAsset(context.getAssets(), "fonts/Gotham-Bold.otf");
        newType = typeface;
    }

    @Override
    public void updateDrawState(TextPaint paint) {

        applyCustomTypeFace(paint, newType);
    }

    @Override
    public void updateMeasureState(TextPaint paint) {

        applyCustomTypeFace(paint, newType);
    }

    private static void applyCustomTypeFace(Paint paint, Typeface tf) {

        paint.setTypeface(tf);
    }
}
Let’s examine what’s going on here as this is the most complicated thing we’ll be doing. Our constructor takes a Context and a String. Since we’re extending the TypefaceSpan class we’re going to call super(family) to construct a TypefaceSpan object with the font family description should we want to specify one. Next we use the passed in Context to obtain a Typeface and then set that to our private Typeface data member.
Next we’re going to override updateDrawState(TextPaint paint) and updateMeasureState(TextPaint paint) to call a method that we’ll use to set the typeface of the custom Paint so that it knows what to do (i.e. paint the text on the screen with the specified font). Lastly we will want to leverage this so let’s add the following method to MainActivity.java and add a call to this method at the end of the onCreate method.
private void setupCustomActionBar() {

    SpannableStringBuilder spannedTitle = new SpannableStringBuilder(this.getTitle());
    spannedTitlte.setSpan (new CustomTypefaceSpan(getApplicationContext(), ""), 0, spannedTitle.length(), Spanned.SPAN_EXCLUSIVE_INCLUSIVE);

    ActionBar actionBar = this.getActionBar();
    if (actionBar != null) {
        actionBar.setTitle(spannedTitle);
    }
}
If we go ahead and run this sample code now we should see the following. An app with a themed ActionBar, TextView, EditText and Button. Pretty cool huh? I think so and I truly hope that this article was helpful. The full sample code project can be found on my GitHub