
Simplifying your Android code with Butter Knife
28 Apr 2016
android programming development UI UX materialdesign libraries butterknifeSo if you’re an Android developer than you’ve used findViewById. As an Android developer you’ve undoubtedly seen, and called, that method many times. It helps you access views contained in the layout files of your Activities or Fragments.
Many of your apps have their onCreate or init methods littered with this method call to obtain reference to all your views that need to interact with your code. Special logic to hide or show a button?… you’ll need findViewById. Certain criteria to change to color of a TextView? … you’ll need findViewById.
What if there was a better way? Jake Wharton, an engineer at Square, has built such a way. Butter Knife has it’s roots in libraries like Guice & Dagger. These are dependency injection (DI) libraries. Butter Knife follows in that it too is a dependency injection albeit less powerful than the others as it focuses on just handling field and method binding to layouts. To quote Jake Wharton’s Butter Knife GitHub page, “A butter knife is like a dagger only infinitely less sharp.”
Butter Knife was built to do the following:
- Allow field and method binding
- Connect views & resources easily & cleanly
- Using annotations to generate boilerplate code
What can you expect from Butter Knife…
Butter Knife lets you annotate your fields in your Java code so that you don’t need to link it to a view id from your layout. So one of the main benefits is no more findViewById calls. Similarly, you’re able to annotate methods in your Java code to handle clicks. That’s pretty rad considering before you had to either create a find and then an anonymous inner class to handle the click on that field OR have an onClick attribute on the field in your layout and hope you created the method with the same name.
Here’s where Butter Knife gets interesting. Say you’ve a bunch of fields in your layout that get hidden or unhidden depending on some logic? Butter Knife lets you operate on a group of views, via a list or array, with actions or setters so instead of a loop through the fields of a field group you’re able to easily act on all of the fields with a line of code.
Finally, Butter Knife helps eliminate resource lookups by using resource annotations on fields. So colors, strings, values, etc. can all be mapped to a field via an annotation. All of these features are what you can expect from the Butter Knife library to help you keep your codebase neat and tidy. So let’s get going with Butter Knife!
Installation…
First, we’ll update our Project build.gradle. Be sure to include the mavenCentral() repository.
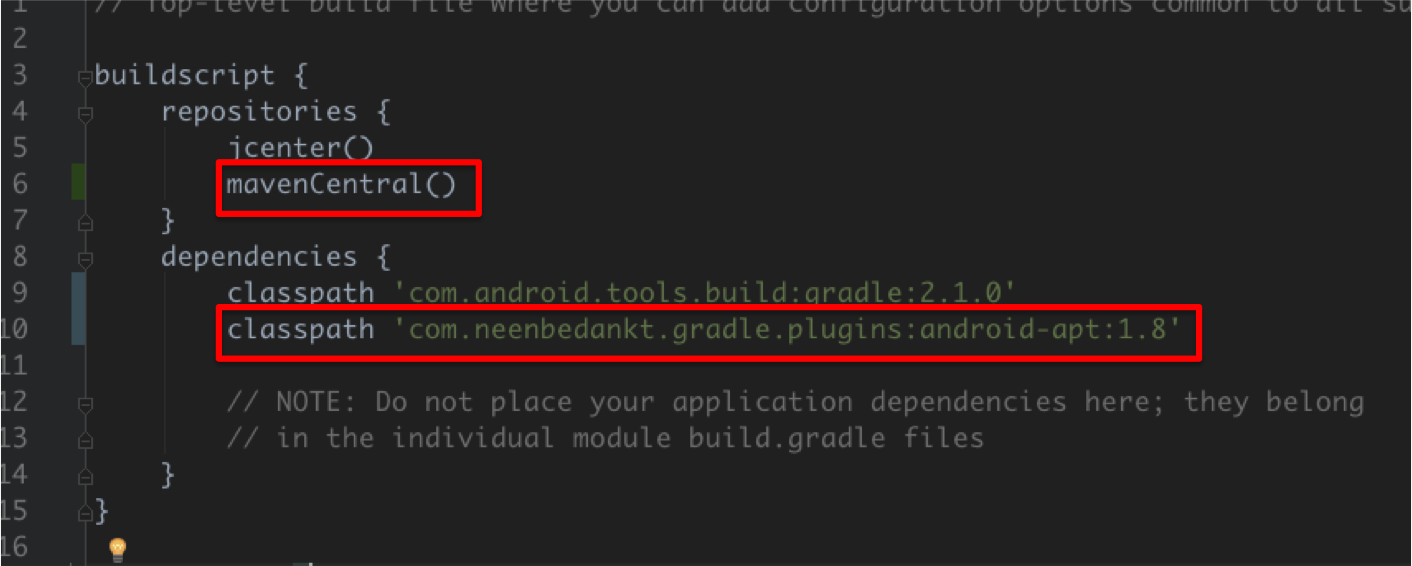
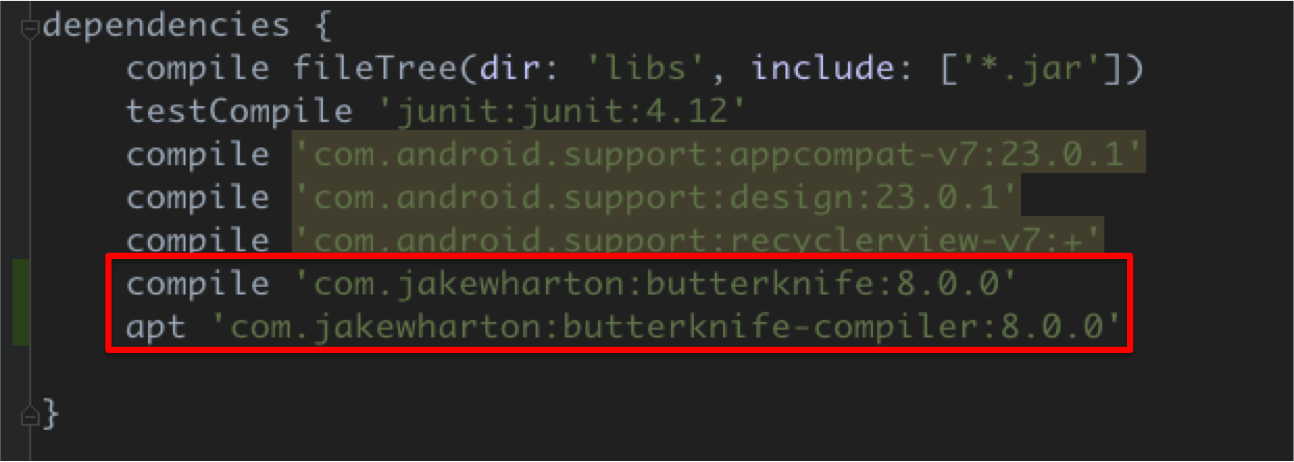
Now we’ll move over to our Module build.gradle. First we’ll apply the com.neenbedankt.android-apt plugin. This plugin helps with annotation processing and serves two purposes: Allow compile time annotation processing and assisting in generating the boilerplate code.

Next we’ll update our Project’s build.gradle to include the

Simplify with Butter Knife…
Butter Knife leverages annotations. For those of you not used to annotations, they’re simply metadata on the fields, methods or classes they’re annotating. For example, if you’ve seen @Override or @SuppressWarning you’ve seen annotations. With Butter Knife one of the more popular annotations that you’ll be using is @BindView.
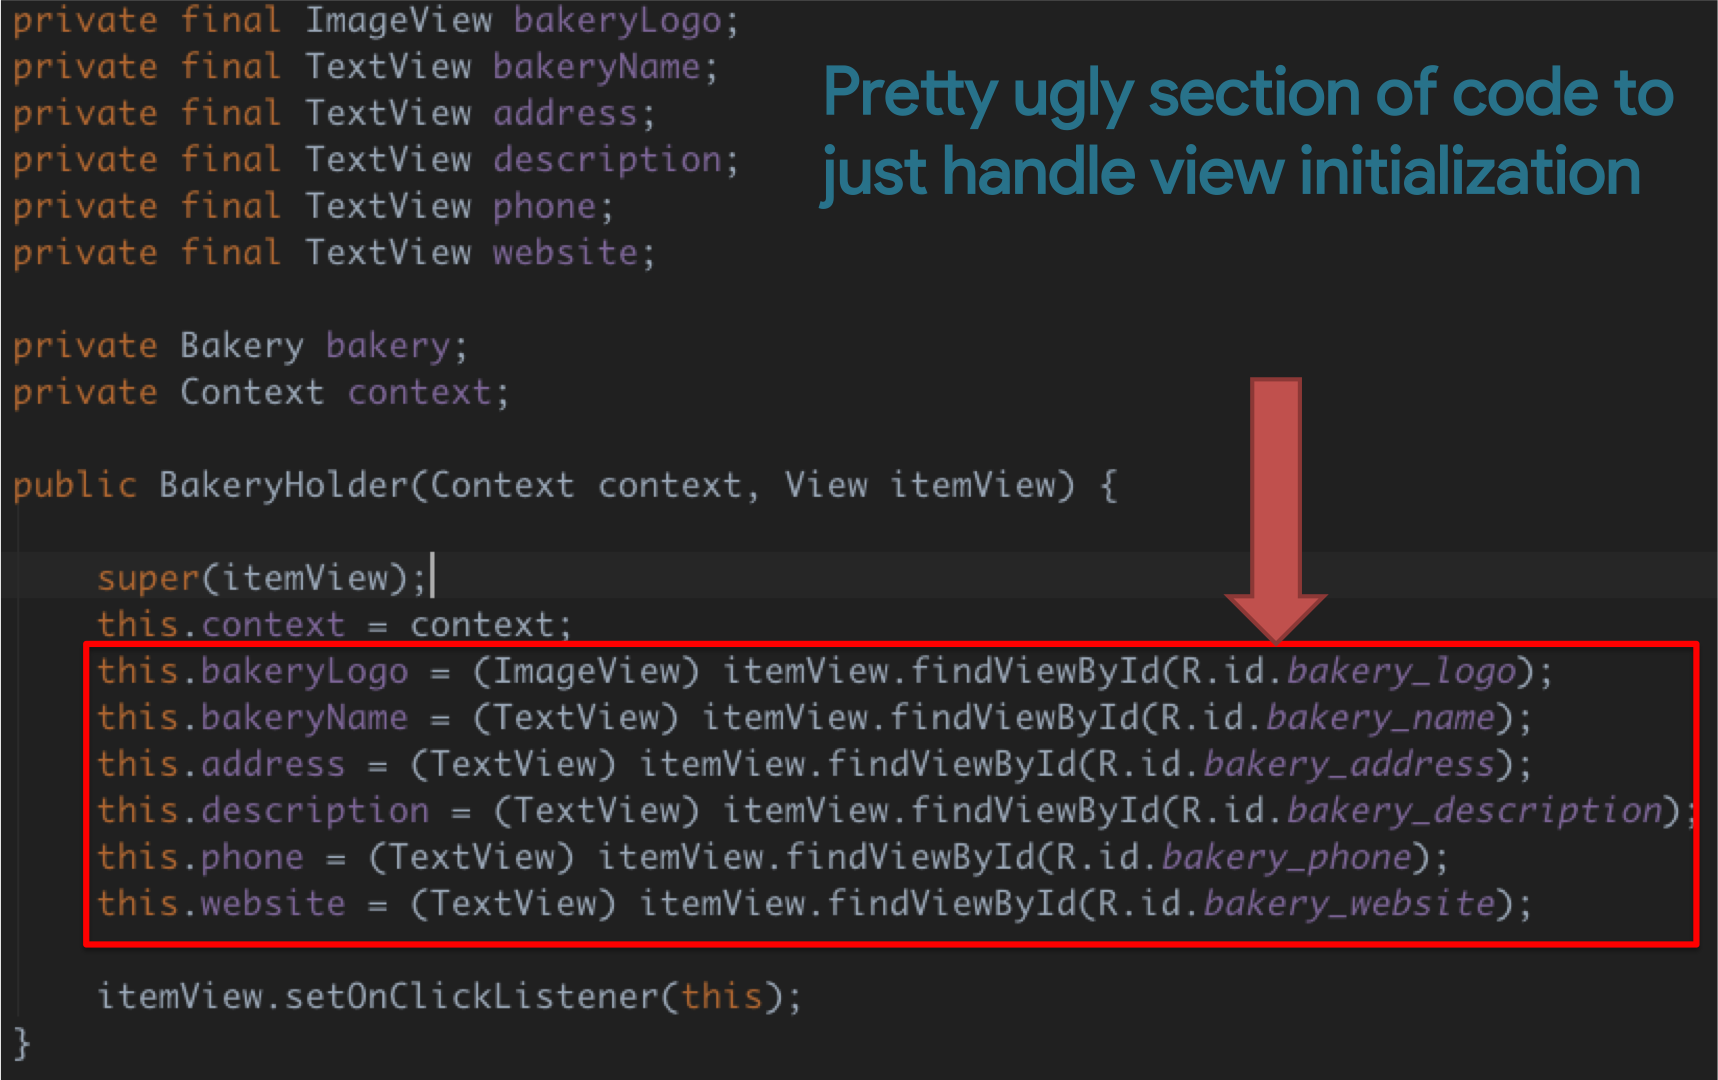
This tutorial we’ll be leveraging the FaveBakes project. The starting point for which can be found on GitHub and can be downloaded here. Here’s a snippet of code from our project. As you can see this code is pretty busy doing stuff that has to be done in order for you to get to the fun stuff. This is a lot of ugly and all we’re doing is getting fields set to their corresponding views from our layout.
With Butter Knife this:
RecyclerView listingsView = (RecyclerView)findViewById(R.id.listings_view);
Toolbar toolbar = (Toolbar)findViewById(R.id.toolbar);
can become this:
@BindView(R.id.listings_view) RecyclerView listingsView;
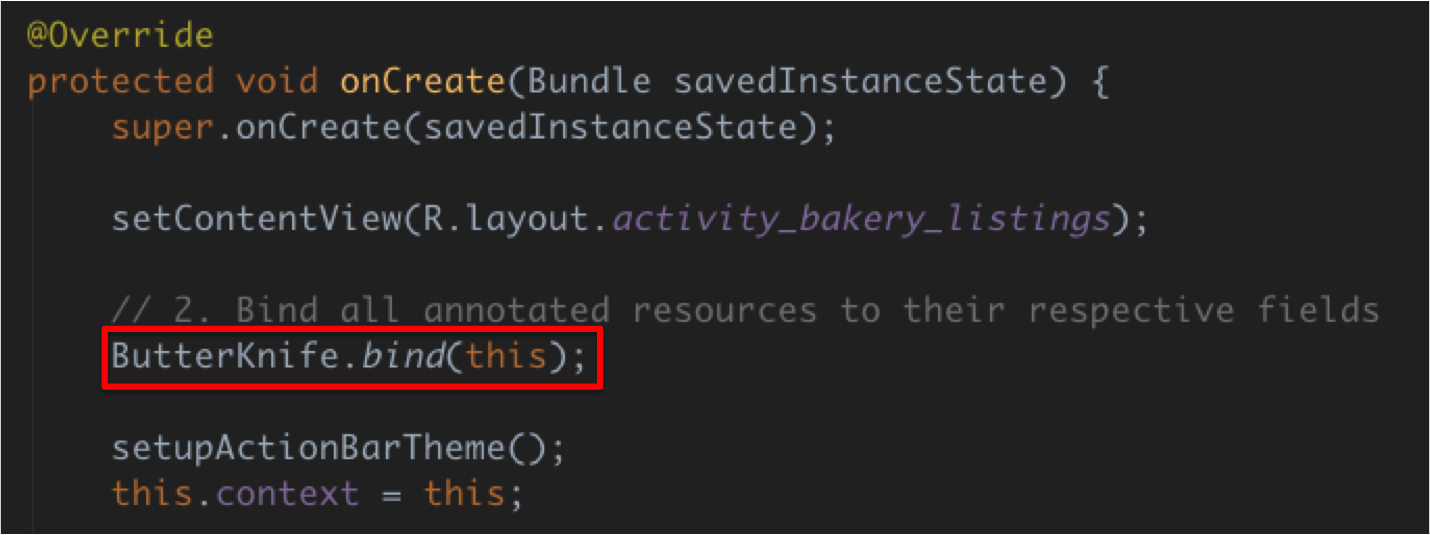
@BindView(R.id.toolbar) Toolbar toolbar;That’s much simpler. This sets up the plumbing. Now we just make a call in our BakeryListingsActivity’s onCreate method to actually have the Butter Knife library bind all the fields and methods we’ve annotated to their corresponding views in the layout. So far pretty easy.
ViewHolder & Fragments
What about ViewHolders and Fragments? Can Butter Knife handle them too? Yes. Yes it can. Earlier we took a look at an example of some ugly code. That was our BakeryHolder class, an extension of RecyclerView.ViewHolder. Below let’s see what that code looks like with Butter Knife. As you’ll notice, with the refactoring the constructor is much cleaner.
public class BakeryHolder extends RecyclerView.ViewHolder implements View.OnClickListener {

    // 1. Define the bindings to the ViewHolder's views
    @BindView(R.id.bakery_logo) ImageView bakeryLogo;
    @BindView(R.id.bakery_name) protected TextView bakeryName;
    @BindView(R.id.bakery_address) protected TextView address;
    @BindView(R.id.bakery_description) protected TextView description;
    @BindView(R.id.bakery_phone) protected TextView phone;
    @BindView(R.id.bakery_website) protected TextView website;

    private Bakery bakery;
    private Context context;

    public BakeryHolder(Context context, View itemView) {

        super(itemView);
        this.context = context;

        // 2. Bind Butter knife to this view holder
        ButterKnife.bind(this, itemView);

        itemView.setOnClickListener(this);
    }

    public void bindBakery(Bakery bakery) {

        this.bakery = bakery;
        this.bakeryName.setText(bakery.bakeryName);
        this.address.setText(bakery.address);
        this.phone.setText(bakery.phoneNumber);
        this.website.setText(bakery.websiteUrl);
        this.description.setText(bakery.description);
        this.bakeryLogo.setImageBitmap(bakery.logo);
    }

    // ...
}
Here’s an example on how Butter Knife would be used with a Fragment. Notice the class scope Unbinder object. This is what calls to ButterKnife.bind() returns and allows you to call unbind. This is very useful for Fragments as onDestroyView may be called but the instance of the fragment is still present. unbind helps you keep things tidy. You can also call unbind from an Activity’s onDestroy() too if you wanna be super clean.
private Unbinder unbinder;

@Override
public View onCreateView(LayoutInflater inflater,
                         ViewGroup container,
                         Bundle savedInstanceState) {

    View view = inflater.inflate(R.layout.fancy_fragment,
                                 container,
                                 false);

    unbinder = ButterKnife.bind(this, view);

    // TODO Use fields...

    return view;
}
Other resources
Butter Knife is not just for views. Pretty much any resource you have that you’d like to bind to an Activity or Fragment to avoid using getResources()
// Example bindings for resources
@BindBitmap(R.mipmap…)
@BindString(R.string…)
@BindArray(R.array…)
@BindBool(R.bool…)
@BindColor(R.color…)
@BindDimen(R.dimen…)
@BindDrawable(R.drawable…)
@BindInt(R.integer…)
Our FaveBakes project has some pretty messy code in our loadBakeries method. In particular the section that has this snippet:
Bitmap alessiIcon = BitmapFactory.decodeResource(getResources(), R.mipmap.alessi);
Bitmap floridaIcon = BitmapFactory.decodeResource(getResources(), R.mipmap.florida);
Bitmap housewifeIcon =BitmapFactory.decodeResource(getResources(), R.mipmap.piece);
Bitmap mauricioIcon = BitmapFactory.decodeResource(getResources(), R.mipmap.mauricio);
Bitmap pieIcon = BitmapFactory.decodeResource(getResources(), R.mipmap.pie);
If we moved our declaration of all these bitmaps to be members of the class instead of local variables in the method, we can simplify this code and avoid explicitly calling getResources() and using the BitmapFactory class.
public class BakeryListingsActivity extends AppCompatActivity {

    // 1. Bind views on the activity with the @BindView annotation
    @BindView(R.id.listings_view) RecyclerView listingsView;
    @BindView(R.id.toolbar) Toolbar toolbar;

    @BindBitmap(R.mipmap.alessi) Bitmap alessiIcon;
    @BindBitmap(R.mipmap.florida) Bitmap floridaIcon;
    @BindBitmap(R.mipmap.piece) Bitmap housewifeIcon;
    @BindBitmap(R.mipmap.mauricio) Bitmap mauricioIcon;
    @BindBitmap(R.mipmap.pie) Bitmap pieIcon;

    private List<Bakery> bakeries;
    private Context context;

    // ...
Pretty neat huh? Nice not having to worry about getting a context to call getResources.
Clicks
While we’ve focused a lot on fields Butter Knife also handles click handling. To show an example, we’re going to take the website link that appears in each item in the RecyclerView and make it clickable.
In BakeryHolder.java we are going to add a new method called launchWebsite that takes in a parameter of a TextView which will represent the TextView that is clicked by the user. Have you noticed the big change in the snippet below? That’s right. The annotation above the method declaration. @OnClick(R.id.bakery_website) binds the launchWebsite(TextView url) method to the onClick event of the R.id.bakery_website view. Neat. No fussing around with layout files and no anonymous inner classes to handle the onClick.
// 3. Handle clicks on the bakery website
@OnClick(R.id.bakery_website)
public void launchWebsite(TextView url) {

    String websiteUrl = url.getText().toString();
    if (URLUtil.isValidUrl(websiteUrl)) {

        Intent browserIntent =
                new Intent(Intent.ACTION_VIEW, Uri.parse(websiteUrl));
        context.startActivity(browserIntent);
    }
}
Note that in the example above, we’re passing in the TextView so that we can read from the TextView that was clicked and grab the URL. That said, the method does NOT have to be provided and the @OnClick would still work. For example, if you pressed a view and wanted an activity to launch you may not need to know which view was pressed. In that scenario you can omit the parameter. The @OnClick annotation also works with a list of views where you may want to bind multiple views to the same method to handle all of those views onClick events. @OnItemSelected is also supported.
Groups of views
Actions
With Actions we’re able to act on each view in viewsToChange. Here we have defined a ButterKnife.Setter to take in a View and an Integer representing the visibility that each view in viewsToChange should have.
ButterKnife.apply(viewsToChange, SetInvisible, View.VISIBLE);

//...

static final ButterKnife.Action<View> SetInvisible = new ButterKnife.Action<View>() {
    @Override
    public void set(View view, Integer value, int index) {
      view.setVisibility(View.INVISIBLE);
    }
}
Setters
With Setters we’re able to take in a value property and set a value on a view. Here we have defined a ButterKnife.Setter to take in a View and an Integer representing the visibility that each view in viewsToChange should have.
ButterKnife.apply(viewsToChange, ChangeVisibility, View.VISIBLE);

//...

static final ButterKnife.Setter<View, Integer> ChangeVisibility = new ButterKnife.Setter<View, Integer>() {
    @Override
    public void set(View view, Integer value, int index) {
      view.setVisibility(value);
    }
}
Conclusion
So with Butter Knife we were able to simplify our app a little bit. Butter Knife is a pretty lightweight library that uses dependency injection along with annotations to provide binding between fields and methods and the views of the layout.
Butter Knife is pretty useful for avoiding lots of extra coding. Useful for binding not just views but event handling such as clicks. Also can be used for binding other resources. Here you can find the complete source code of FaveBakes with all the buttery goodness of Butter Knife.

I hope this helps!