
Keep your app relevant with Firebase App Indexing
2 May 2017
android programming development firebaseHow many apps do you have on your Android or iOS device? The devices come with around 10 already installed from the manufacturer. Add in your games, social media, messaging apps and this number can grow quickly. Luckily for you Google & Apple let you store your apps in folders. Where you can declutter your home screens and forget about those apps forever. This however can cause a problem for you the app developer.
After the initial glee your app creates for your users it will soon be passed over for the latest and greatest apps that they download. Ouch right? You spent a lot of time getting your app to be awesome and now it’s forgotten. What if I told you that you can bring your app back to your user’s attention? Well you can with App Indexing from Firebase.
What’s App Indexing?
Do you know how Google works so fast? Despite what the Lycos commercial** from the ’90s would have you believe there isn’t some super fast dog running off to get your search results. Google looks at webpages, follows the links on those pages and then indexes that information. The way webpages are indexed allows Google to take your search criteria, look that up in the index and report back to you the results. In order for Google to know about a website, web masters have to tell Google the address of the site. This process of looking up websites and understanding the linked pages is known as web crawling and indexing.
App Indexing is like this except for apps instead of websites. Firebase App Indexing allows developers to get their app’s data into the Google index. This allows for autocompleting search criteria and taking users directly to content in your app from a search result.
NOTE:
App Indexing requires linking to your website. Your website should be setup such that the URLs match views in your app. You’ll also need access to the Google Webmaster tools & the Google Play Store Developer Portal.
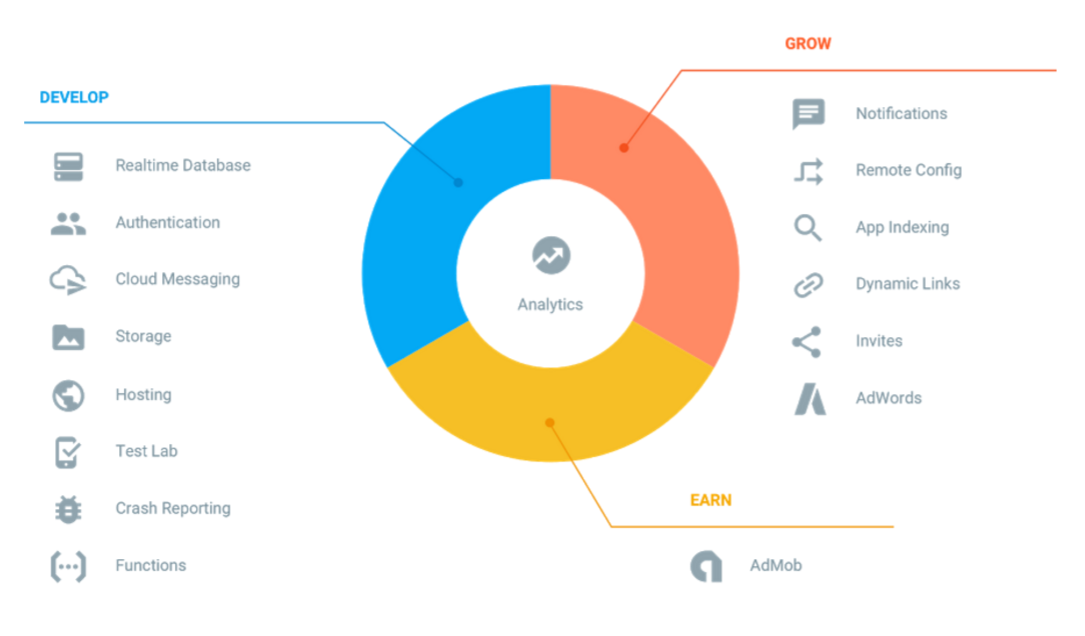
Firebase… what is it?
Firebase is a set of tools aimed at making apps easier to develop.
Understanding Deep Links
To understand deep links let’s take a look at the Amazon homepage. With Amazon, their homepage URL is

That’s where you’d typically visit if you were interested in searching for the products you needed. Last week though you favorited a URL for that new dongle you need for your new MacBook Pro. (Seriously Apple?!) That URL looks like:
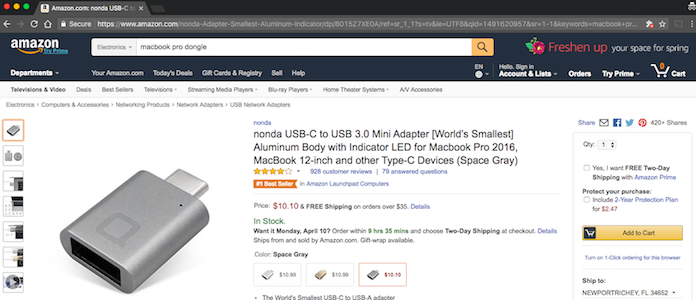
As you’re go deeper into the Amazon website, these URLs beyond the homepage represent deep links. Any page beyond the website’s homepage can be considered a deep link. Google crawls these links, indexes them and presents them to you when you search for “macbook pro dongle”. How can we get Google to know about our app’s data and let users open to a specific screen in your app? What if we can tell Google to index specific URLs and map them to screens in our app. And what if clicking those search result links would take us directly to those screens in our app if our app is installed OR if it isn’t installed, present them with a button to install our app.
That’s what Firebase App Indexing can do for you.

Firebase App Indexing
Now we understand what deep linking is: accessing content beyond the webpage with a specific url. That’s great and all but what’s it have to do with Android or my app? In Android terms, deep linking would equate to clicking a link and going beyond our home screen to a specific view where we can jump right to what we want to look at. Let’s take a look at how we can do this with Android & Firebase. App Indexing then allows us to index the various views of our app with Google search.
Download the starter project
To start off let’s download the starter project. You can download it here. If you’ve been reading this blog you may know that I have a sample app called FaveBakes. FaveBakes is a simple app that demonstrates some simple concepts like using Firebase data, RecyclerViews, etc. This version of it keeps it simple so we can focus on just the App Indexing feature of Firebase, not the Realtime Database feature.
Setting up our app with Firebase
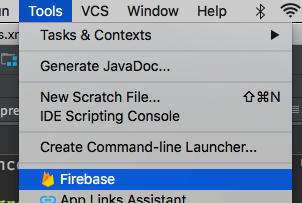
First we’ll set up our app up with Firebase. To do this, lets open the starter project and click on Tools -> Firebase. This will launch the Firebase assistant.
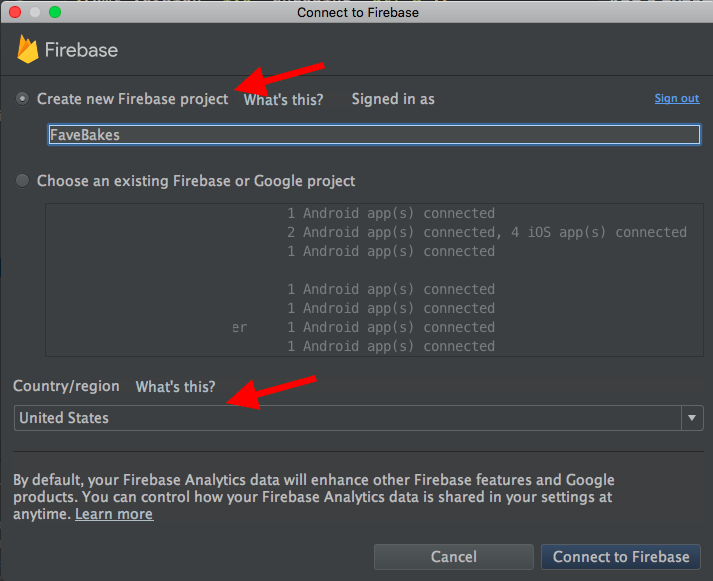
Find the App Indexing section, expand it and click on Getting Started with App Indexing. Click on the Connect to Firebase button. You’ll need to give your Firebase app a name OR connect it to an existing Firebase app. Common sense should apply here. Keep your Firebase name similar, or the same even, to your app name. It’ll make life much easier in the future. Then make sure your region is properly set. Firebase servers are located globally. No sense in creating your Firebase project in a region you or your users aren’t in. Once we’ve got our app connected to Firebase let’s continue with setting up our deep links.
Preparing for deep links
Open the AndroidManifest.xml file. In our sample app, we have a simple manifest. We’ve got our application tag and a couple of activities. One for a splash screen (SplashScreenActivity.java) and another for the main functionality of the app (BakeryListingsActivity.java).
<?xml version="1.0" encoding="utf-8"?>
<manifest package="com.traversoft.favebakes"
          xmlns:android="http://schemas.android.com/apk/res/android">
    <application
        android:name="com.traversoft.favebakes.FaveBakesApplication"
        android:allowBackup="true"
        android:icon="@mipmap/ic_launcher"
        android:label="@string/app_name"
        android:supportsRtl="true"
        android:theme="@style/AppTheme">
        <activity
            android:name=".activities.SplashActivity"
            android:screenOrientation="portrait"
            android:theme="@style/SplashTheme">
            <intent-filter>
                <action android:name="android.intent.action.MAIN"/>
                <category android:name="android.intent.category.LAUNCHER"/>
            </intent-filter>
        </activity>
        <activity
            android:name=".activities.BakeryListingsActivity"
            android:label="@string/app_name"
            android:launchMode="singleTask"
            android:exported="true">
        </activity>
    </application>
</manifest>
In order to achieve deep linking we’ll need some intent-filter elements on the activities we want to enable deep linking to. An intent-filter applies a filter for intents that the activity can respond to. Defining these in the manifest helps the Android OS know that a) it exists and b) how to handle them. In our case, we want to launch the BakeryListingsActivity when our deep link is clicked on. Just before our closing activity tag, we’ll add the following:
<intent-filter android:autoVerify="true">
  <action android:name="android.intent.action.VIEW"/>
  <category android:name="android.intent.category.DEFAULT"/>
  <category android:name="android.intent.category.BROWSABLE"/>
  <data android:scheme="https"
        android:host="traversoft.com"
        android:pathPrefix="/favebakes"/>
</intent-filter>
<intent-filter android:autoVerify="true">
  <action android:name="android.intent.action.VIEW"/>
  <category android:name="android.intent.category.DEFAULT"/>
  <category android:name="android.intent.category.BROWSABLE"/>
  <data android:scheme="http"
        android:host="traversoft.com"
        android:pathPrefix="/favebakes"/>
</intent-filter>
Since we want to display the BakeryListingsActivity we add an action tag to view.
Next, we add two category tags. One is the DEFAULT that’s necessary with
intent-filters. The BROWSABLE category indicates that this intent can be safely
launched from a browser. Since we’re talking about deep linking from a web URL
to the appropriate screen in the app we will definitely need this.
At the end of our intent-filter is a data tag. Our data tag correlates
the activity with the URI we want to launch said activity. In our example we
want this link (http://traversoft.com/favebakes) to launch the BakeryListingsActivity.
So we specify the scheme (http), the host (traversoft.com) and the
pathPrefix (/favebakes) in our data element. Notice that we have two data
elements. Can you spot the difference? I’ll give you a minute. That’s right!
It’s in the scheme. One references an http scheme and the other an https
scheme. Believe it or not but these are different URIs. Furthermore, if we added
the ‘www.’ before our host that would be another different URI we could specify as
another data element.
https://danielmiessler.com/study/url-uri/
This is a great article detailing the differences between a URI & a URL
Lastly, there’s one part of the intent-filter snippet that we haven’t
covered. The android:autoVerify attribute on the intent-filter itself.
Setting this value to true enables automatic verification and hides the
dialog that asks users to choose which app should be used to launch. Without this, Android will prompt your users how to handle taps on that link be it Chrome, other browsers or your app. Setting this to true avoids that and takes users directly to your app when your app is installed and a user clicks on one of your deep links.
Now our activity with intent-filter is registered with the OS, but we’ve not told the OS how to handle these intents in our activity. Before we do that though let’s update our gradle files so we can leverage the necessary Google libraries.
Project build.gradle
First we’ll add the google-services library to the project classpath. Open your the project’s build.gradle file. It should look something like this after you add the google-services classpath.
buildscript {
    repositories {
        jcenter()
    }
    dependencies {
        classpath 'com.android.tools.build:gradle:2.3.0'
        classpath 'com.neenbedankt.gradle.plugins:android-apt:1.8'
        classpath 'com.google.gms:google-services:3.0.0'    // <-- Add this line
        // NOTE: Do not place your application dependencies here; they belong
        // in the individual module build.gradle files
    }
}

allprojects {
    repositories {
        jcenter()
    }
}

task clean(type: Delete) {
    delete rootProject.buildDir
}
App’s build.gradle
Next we want to modify the app’s build.gradle file. Let’s open that now. First we want to tell the app gradle to apply the google-services plugin that we just included in our project gradle.
apply plugin: 'com.google.gms.google-services’Next, we’ll add the following dependency:
compile 'com.google.firebase:firebase-appindexing:10.0.1'Finally, here’s the complete build.gradle for our app module:
apply plugin: 'com.android.application'
apply plugin: 'com.neenbedankt.android-apt'
apply plugin: 'com.google.gms.google-services'   // <-- Added

android {
  compileSdkVersion 25
  buildToolsVersion '25.0.2'
  defaultConfig {
    applicationId "com.traversoft.favebakes"
    minSdkVersion 19
    targetSdkVersion 25
    versionCode 1
    versionName "1.0"
  }
  buildTypes {
    release {
      minifyEnabled false
      proguardFiles getDefaultProguardFile('proguard-android.txt'), 'proguard-rules.pro'
    }
  }
  dataBinding {
    enabled = true
  }
}

ext {
  supportLibVersion = '25.3.0'
  firebaseVersion = '10.0.1'
  butterknifeVersion = '8.0.0'
  glideVersion = '3.7.0'
}

dependencies {
  compile fileTree(dir: 'libs', include: ['`*`.jar'])
  testCompile 'junit:junit:4.12'
  compile "com.android.support:appcompat-v7:${supportLibVersion}"
  compile "com.android.support:design:${supportLibVersion}"
  compile "com.android.support:recyclerview-v7:${supportLibVersion}"
  compile "com.android.support:recyclerview-v7:${supportLibVersion}"
  compile "com.android.support:support-v4:${supportLibVersion}"

  compile "com.google.firebase:firebase-appindexing:${firebaseVersion}"

  compile "com.github.bumptech.glide:glide:${glideVersion}"

  provided "org.projectlombok:lombok:1.12.6"
  compile "com.jakewharton:butterknife:${butterknifeVersion}"
  apt "com.jakewharton:butterknife-compiler:${butterknifeVersion}"
}
Android Studio & App Links Assistant
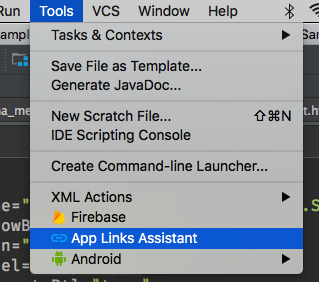
With Android Studio 2.3 comes the App Links Assistant. This built in tool will take care of what we did by hand automatically and even more. You can use it to add any other URI mappings that you may need down the road. Let’s take a look at what else it can do. To access the tool go to Tools -> App Links Assistant
You’ll see the Assistant window slide out from the side. Notice how it walks you through exactly how to achieve deep linking in your Android app with Firebase.
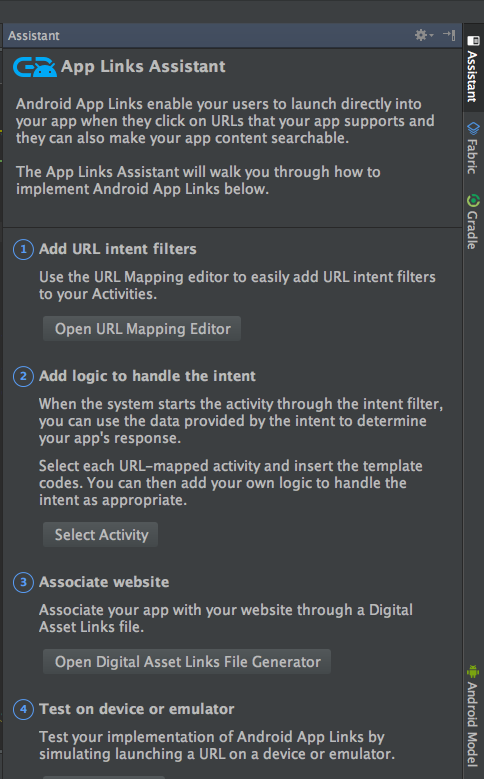
We’ve already added our intent-filters to our AndroidManifest.xml but the App Links Assistant adds a few extras that are worth checking out. It’s easy to add new URL mappings for starters. Notice the preview towards the bottom so you can see what’s going to be added to your AndroidManifest.xml. There’s even a spot to double check the URL maps to the appropriate Activity. Neat! Thanks Google!
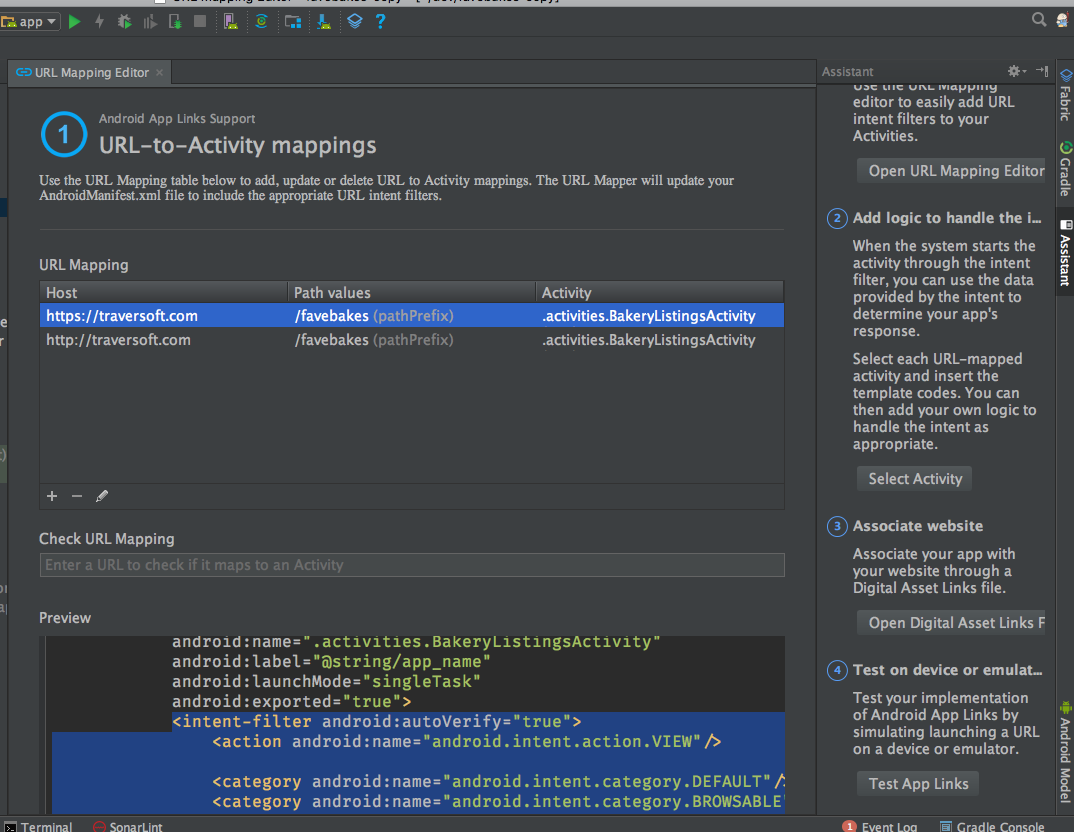
Let’s continue using the App Links Assistant! We’ve finished step 1 manually so let’s move on to step 2: adding logic to handle the intent. With our intent-filter registered we’re effectively telling Android that our Activity can handle that data. Let’s click on Select Activity in the assistant to handle that intent when it’s received.
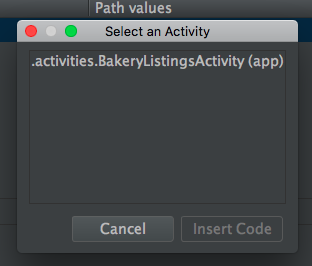
Once we select our BakeryListingsActivity.java and click on the Insert Code button we’ll have the following generated at the end of our Activity’s onCreate method. Aren’t you glad we switched to the assistant? :)
// ATTENTION: This was auto-generated to handle app links.
Intent appLinkIntent = getIntent();
String appLinkAction = appLinkIntent.getAction();
Uri appLinkData = appLinkIntent.getData();
This is the bare bones to help you access the intent and it’s data & type of action. Let’s replace it with something meaningful though.
protected void onNewIntent(Intent intent) {
    String action = intent.getAction();
    String data = intent.getDataString();
    if (Intent.ACTION_VIEW.equals(action) && data != null) {
        String bakeryId = data.substring(data.lastIndexOf("/") + 1);
        Toast.makeText(this, "Loaded " + bakeryId, Toast.LENGTH_SHORT).show();
    }
}
With our new onNewIntent(Intent intent) method, we’re accessing the intent’s action and data with refactored template code. We can call this at different points in the Activity lifecycle should we need to. In this method, we check that the action matches the action we set in our intent-filter and ensure that the data isn’t null. Then we scrape the data for the identifier of the bakery in the URI and output it to the screen via a Toast. This is a really simple implementation. In your scenario you may pull an ID and do a lookup against your app’s database and present that information in the activity. Or perhaps there’s some other parameter which causes some special color formatting of the GUI. Whatever you want to do. Just make sure that we call the method, otherwise nothing exciting is going to happen! I’d advise adding it to the end of the BakeryListingsActivity’s onCreate method.
onNewIntent(getIntent());Associating your website with your app
The key with app indexing is linking your website with your app. When users are presented with a link and your app is installed we want users to come into our app for content. This association between your app and your website is done with: a JSON file placed in a strategic location on your web server AND some website markup. Step 3 of the wizard helps us do this.
assetlinks.json
From the App Links Assistant, click on Open Digital Asset Links File Generator and you should see the following pop up.
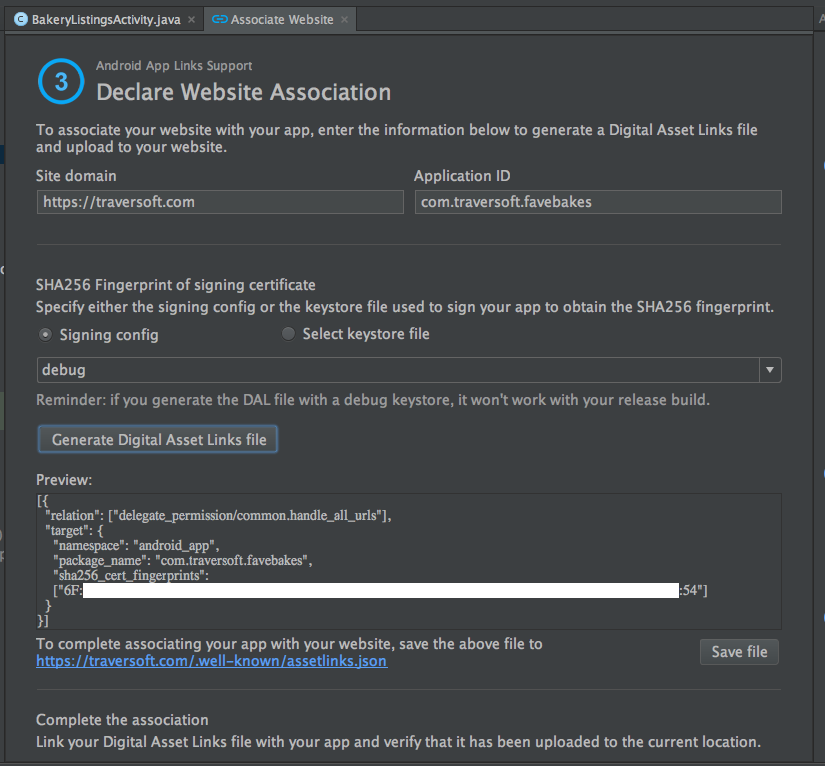
Set your signing preference and click on Generate Digital Asset Links file. In the preview window you’ll see a bit of JSON that helps Google associate your website with your app when it crawls your site.
[{
  "relation": ["delegate_permission/common.handle_all_urls"],
  "target": {
    "namespace": "android_app",
    "package_name": "com.traversoft.favebakes",
    "sha256_cert_fingerprints": ["  ...sha256 hash...  "]
  }
}]
NOTE:
To do this with the production Play Store version of your app you’ll need your release keystore! (-_o)
NOTE:
Do you like doing things on your own? Create your sha256 hash on your own using:
keytool -list -v -keystore
<path to keystore>/<keystore filename>.jks
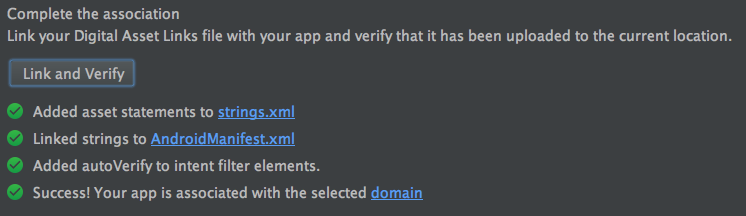
Save this into a file named assetlinks.json and store this file on your web server. You’ll probably need to create a folder in the home directory called .well-known. Make sure you’ve got hidden files set to visible if you’re using a GUI. The wizard will tell you exactly where this file should exist and provide you a link. Once you drop the file into that directory you’ll be able to click the link and test it out. Finally, click the Link and Verify button. It’ll go ahead and make sure files are all in the right place & set up correctly.
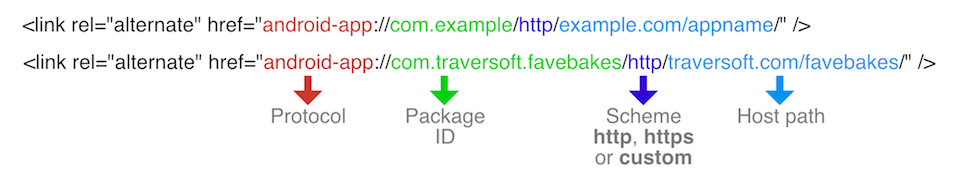
Relative link
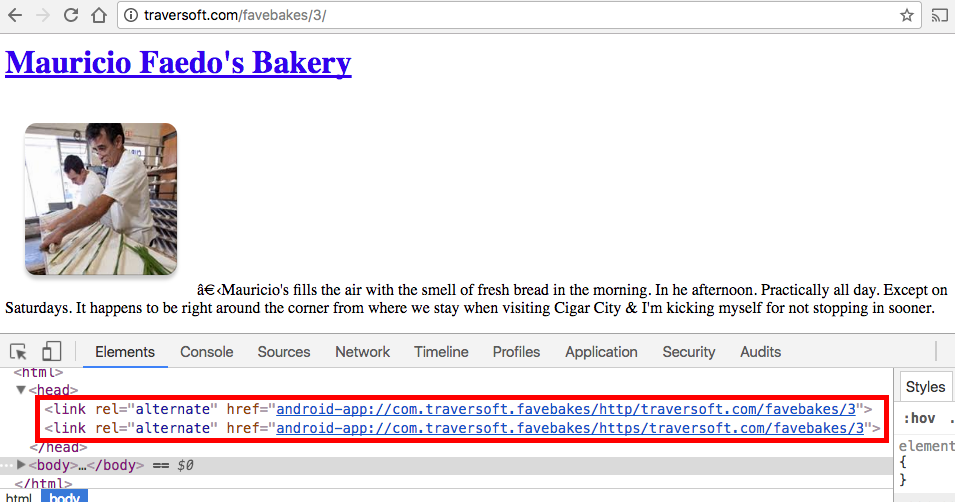
The markup above is added to all pages we want to associate with views in our app. The rel="alternative" indicates to Google that there is another location where this webpage exists. The href then tells us where that is. First we see the protocol, android-app, followed by the package name of the android app. Next we see the scheme. In our example, we have two relative links. One for the http scheme and one for the https scheme. Following this is the host path.
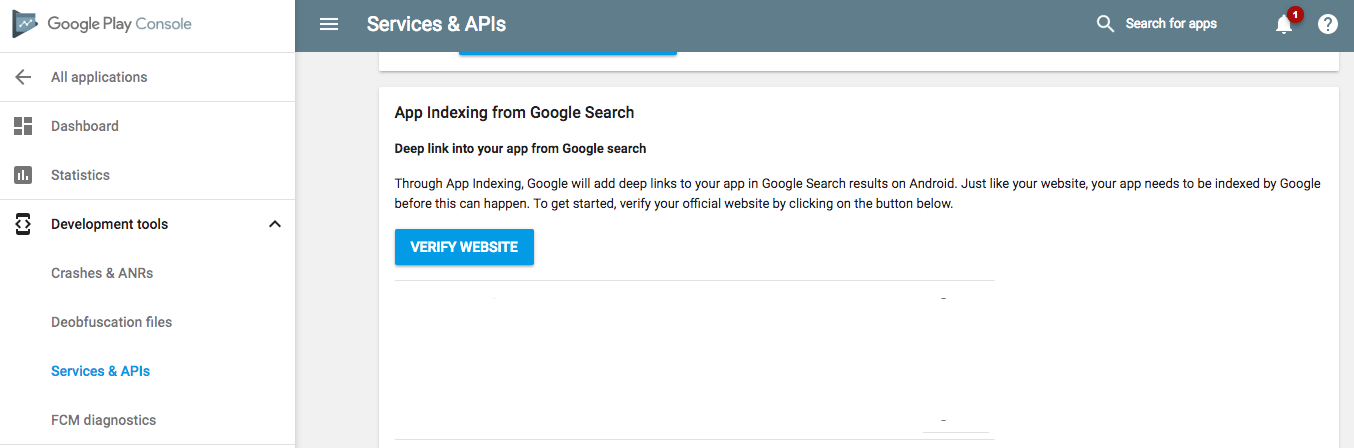
Verifying your website association
The final step is to verify your website with Google via the developer portal of the Play Store. You’ll want to log into the Play Store’s developer portal and find your app. From the left menu, expand Development Tools and look for Services & APIs. Once you click on Services & APIs scroll down and find the App Indexing from Google Search section. Go ahead and enter your website. Don’t forget all the different permutations https/http with/without the www. Once you do this you’ll need to head over to the Google Search Console and approve the request.
Be mindful that it is going to take some time to verify your websites & then have Google index your web site. So it’s useful to start this process during the development process so that you’re ready to go when your app is published.
Indexing the Indexables
That was a lot of setup huh? Let’s get back to coding! Earlier, we mentioned how Google search indexes web pages to make search possible. Now we’re going to add data in our app into that index so Google can find it and present that data in search & autocompletion results.
In this demo, when a user clicks on a bakery in the list we’ll add that bakery information to the index. Let’s find BakeryHolder.java file and add the following method to it.
private void indexBakery() {
    Indexable bakeryToIndex = new Indexable.Builder()
            .setName(bakery.getBakeryName())
            .setUrl("https://traversoft.com/favebakes/" + bakery.getBakeryId())
            .setImage(bakery.getImgUrl())
            .build();

    Task <Void> task = FirebaseAppIndex.getInstance().update(bakeryToIndex);
    task.addOnSuccessListener(new OnSuccessListener<Void>() {
        @Override public void onSuccess(Void aVoid) {
            Log.d(TAG, "App Indexing API: Successfully added note to index");
        }
    });

    task.addOnFailureListener(new OnFailureListener() {
        @Override public void onFailure(@NonNull Exception exception) {
            Log.e(TAG, "App Indexing API: Failed to add note to index. " + exception.getMessage());
        }
    });
}
We’ll call the indexBakery() method whenever we want to index a bakery. In our case, on item taps. First we create an Indexable object using Indexable.Builder(). We’re setting the name of the Indexable, the URL, the image (via URL). The following is our onClick method that we’ll use to handle user taps on the items of the RecyclerView. With each item tap we’ll add our bakery information to the index.
NOTE:
By default
Indexableis marked as public. If you wanted to add to the private, on device only, index you must explicitly specify this like so when creating yourIndexable. It’s IMPORTANT that you set private data to private. For example, if you were building a contacts app you would make sure that data is added ONLY to the private, on device index and NOT uploaded to Google’s index by default..setMetadata(new Action.Metadata.Builder().setUpload(false))
Other examples are: the user presses a Send Message button and you index the message data. Or the user added an item to their shopping list and you index the updated list. Here’s how we do it in FaveBakes:
@Override public void onClick(View v) {
   if (this.bakery != null) {
       Toast.makeText(this.context, "Clicked on " + this.bakery.getBakeryName(), Toast.LENGTH_SHORT ).show();
       indexBakery();
       FirebaseUserActions.getInstance().end(getBakeryViewAction());
       FirebaseUserActions.getInstance().end(getBakeryAction());
   }
}

private Action getBakeryAction() {
    return new Action.Builder(Action.Builder.LIKE_ACTION)
            .setObject(bakery.getBakeryName() + " Bakery",
                       "https://traversoft.com/favebakes/")
            .build();
}

private Action getBakeryViewAction() {
    return new Action.Builder(Action.Builder.LIKE_ACTION)
            .setObject(bakery.getBakeryName() + " Bakery",
                       "https://traversoft.com/favebakes/" + bakery.getBakeryId() + "/")
            .build();
}
You’ll notice there are calls to FirebaseUserActions.getInstance().end(Action action). This tells Firebase that an action has happened. An instantaneous action according to the docs. If you use this in conjunction with a preceding call to FirebaseUserActions.getInstance().start(Action action) you’ll be helping Google understand how long your event took place for and improving rankings and search results. For example, starting to read an article when a view appears and an end to reading the article when the view is dismissed.
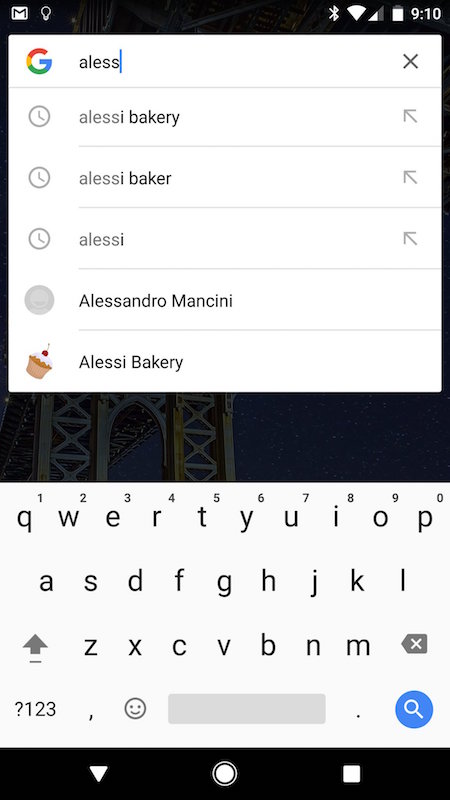
Once data is added to the index it becomes searchable. So if we build and launch the app (or install from the play store) let’s click on one or two of the bakeries. Then let’s go back to the home screen and access the Google Search app. If we search for one of the bakeries we clicked on by name we’ll see it in the autocomplete results. If we search for one of the bakeries that we didn’t click on in the app it will not appear in the autocomplete results.
Here’s an example of what happens when we search for “aless”. You’ll see the autocomplete suggestion matching one of the bakeries we tapped on: Alessi Bakery. Also notice the app icon? A subtle reminder of your app. As you can see this is a great way to unobtrusively re-engage with your users by presenting them with their own data while they’re not in your app.
If you’re ever in the Tampa area Alessi Bakery is a great place to check out. It’s off the beaten path but reminds me of bakeries you’d find in Brooklyn.
Download the final project
If you want to download the final project you can download it here. When you try to do a gradle sync or build you’ll see it fail. You’ll need to connect your app to Firebase with the assistant OR add your google-services.json to the project and you’ll be all set.
TL;DR
Users download lots of apps but once they’ve downloaded them chances are they’ve forgotten them. Until the marketing team sends out a push message and reminds them to delete it. What if there were a better way to remind the users about your app. A way you could remind them about your app AND be useful at the same time. That’s where Firebase App Indexing comes in!
Using deep linking, the Firebase App Indexing SDK you can add your user’s app data to Google’s public search index or the private index on the device. Next time your user searches for something in the Google Search app, or Google itself, they’ll be presented with data they’ve stored in your app. A nice, useful reminder to your users and a great way to re-engage your users.
As always, I hope this helps. If you’ve got any questions reach out to me on Twitter, Facebook or in the comments below.
** Lycos commercial
Fun side note, this one’s narrated by Ed Helms (aka Stu from the Hangover movies)