Dart with Flutter - Your next new favorite language
7 Jun 2017
android ios programming development dart flutterOK so how many times do you have a client come to you and say I would like to have an iOS version AND an Android version of an app built. What do you mean it’s going to take twice as long? If you already built it once why do you need to build it again? Any situation you find yourself in where you want one codebase to generate two native apps (no Xamarin and no HTML5) Dart & the Flutter SDK are here to help.
Dart and the Flutter SDK
Google unveiled it’s Flutter SDK for Dart in grand fashion at this year’s I/O. If you didn’t get a chance to watch that session online I strongly encourage you to do so.
So what is Flutter?
“Flutter is a new mobile app SDK to help developers and designers build modern mobile apps for iOS and Android.”
Dart is a popular language at Google. Flutter lets you write Dart code that builds mobile apps for the iOS & Android platforms. I’ve been writing Flutter with the IntelliJ IDEA IDE. However you can also use IntelliJ WebStorm. You’ll need plugins for Dart and for Flutter. They’re pretty easy to install too. From your IDE, open your plugin preferences (Preferences > Plugins on macOS, File > Settings > Plugins on Windows & Linux) and search for & install the Flutter & Dart plugins.
Widgets
Flutter provides a TON of widgets to let you build your app UI. And not just it’s own widget designs. For iOS specific widgets (like switches, spinners, etc.) there are CupertinoWidgets. For the Material Design inspired Google UI widgets you’ve got MountainView widgets. These widgets match the same widgets you’d get with those platforms.
Flutter widgets are built using a functional-reactive framework, which takes inspiration from React. When you build your UI with Flutter it’s entirely built out of widgets. A widget could be a Button or a TextView or all sort of UI components that you’re probably already familiar with. Widgets can have a child widget or collection of children widgets. The premise is that you have one root widget and build from there.
Widgets have configuration and state. A widget’s state helps determine how it could look to the user. For example, you may have a Table widget that displays a list of items sourced from a REST call. When your widget loads you have a list of zero (0) items you may want to show a CupertinoActivityIndicator. Then when the items load you can call setState to update your widget’s state and switch to a Table widget. When a widget’s state changes, the widget is rebuilt and the changes are then applied. Note that it’s just the changes and not the entire UI. That’s how the Hot Reload works so quickly. More on that later though.
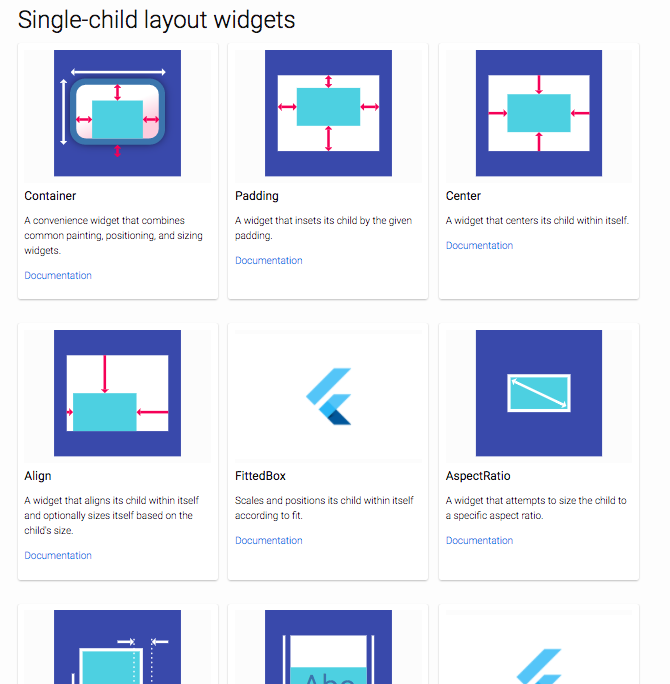
For a full listing of widgets check out the Flutter widgets page
Creating our first app
So let’s create our first Flutter app shall we. Once you’ve gone through all the steps outlined in the Flutter Installation & Setup documentation, open up a terminal or command line prompt. From there, assuming you have Flutter on your path, you can enter the following command to create your first Flutter app:
$ flutter create firstflutterapp
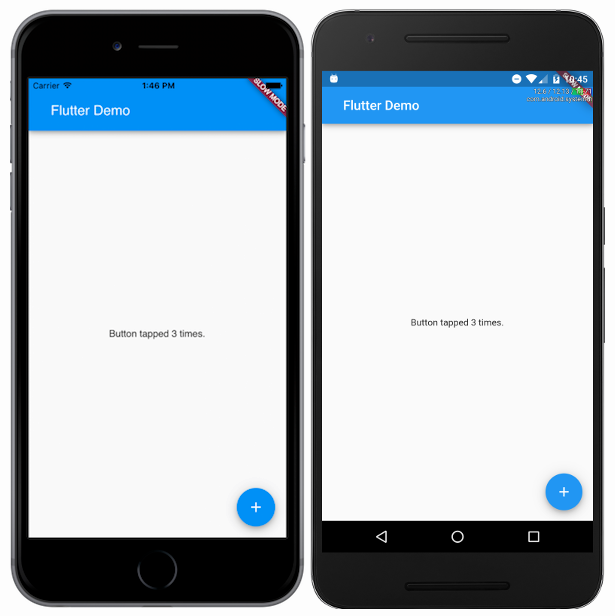
Changing your current directory to the one you’ve just created firstflutterapp you can see everything it’s created for you. Your Android project & your iOS project. If you’re familiar with that development then the files you see in the screenshot below should look familiar to you.

NOTE:
If you have IntelliJ IDEA or WebStorm and installed the Flutter plugin this process is a little less complicated because it’s as easy as File > New Project
Notice the lib folder? That’s all the Dart+Flutter code. That one file is all you’ll need to generate the following sample starter app. The starter project generates a button tap counter app and the code for this is below that.
import 'package:flutter/material.dart';

void main() {
  runApp(new MyApp());
}

class MyApp extends StatelessWidget {
  // This widget is the root of your application.
  @override
  Widget build(BuildContext context) {
    return new MaterialApp(
      title: 'Flutter Demo',
      theme: new ThemeData(
        // This is the theme of your application.
        //
        // Try running your application with "flutter run". You'll see the
        // application has a blue toolbar. Then, without quitting the app, try
        // changing the primarySwatch below to Colors.green and then invoke
        // "hot reload" (press "r" in the console where you ran "flutter run",
        // or press Run > Hot Reload App in IntelliJ). Notice that the counter
        // didn't reset back to zero; the application is not restarted.
        primarySwatch: Colors.blue,
      ),
      home: new MyHomePage(title: 'Flutter Demo Home Page'),
    );
  }
}

class MyHomePage extends StatefulWidget {
  MyHomePage({Key key, this.title}) : super(key: key);

  // This widget is the home page of your application. It is stateful, meaning
  // that it has a State object (defined below) that contains fields that affect
  // how it looks.

  // This class is the configuration for the state. It holds the values (in this
  // case the title) provided by the parent (in this case the App widget) and
  // used by the build method of the State. Fields in a Widget subclass are
  // always marked "final".

  final String title;

  @override
  _MyHomePageState createState() => new _MyHomePageState();
}

class _MyHomePageState extends State<MyHomePage> {
  int _counter = 0;

  void _incrementCounter() {
    setState(() {
      // This call to setState tells the Flutter framework that something has
      // changed in this State, which causes it to rerun the build method below
      // so that the display can reflect the updated values. If we changed
      // _counter without calling setState(), then the build method would not be
      // called again, and so nothing would appear to happen.
      _counter++;
    });
  }

  @override
  Widget build(BuildContext context) {
    // This method is rerun every time setState is called, for instance as done
    // by the _incrementCounter method above.
    //
    // The Flutter framework has been optimized to make rerunning build methods
    // fast, so that you can just rebuild anything that needs updating rather
    // than having to individually change instances of widgets.
    return new Scaffold(
      appBar: new AppBar(
        // Here we take the value from the MyHomePage object that was created by
        // the App.build method, and use it to set our appbar title.
        title: new Text(widget.title),
      ),
      body: new Center(
        // Center is a layout widget. It takes a single child and positions it
        // in the middle of the parent.
        child: new Column(
          // Column is also layout widget. It takes a list of children and
          // arranges them vertically. By default, it sizes itself to fit its
          // children horizontally, and tries to be as tall as its parent.
          //
          // Invoke "debug paint" (press "p" in the console where you ran
          // "flutter run", or select "Toggle Debug Paint" from the Flutter tool
          // window in IntelliJ) to see the wireframe for each widget.
          //
          // Column has various properties to control how it sizes itself and
          // how it positions its children. Here we use mainAxisAlignment to
          // center the children vertically; the main axis here is the vertical
          // axis because Columns are vertical (the cross axis would be
          // horizontal).
          mainAxisAlignment: MainAxisAlignment.center,
          children: <Widget>[
            new Text(
              'You have pushed the button this many times:',
            ),
            new Text(
              '${_counter}',
              style: Theme.of(context).textTheme.display1,
            ),
          ],
        ),
      ),
      floatingActionButton: new FloatingActionButton(
        onPressed: _incrementCounter,
        tooltip: 'Increment',
        child: new Icon(Icons.add),
      ), // This trailing comma makes auto-formatting nicer for build methods.
    );
  }
}
That’s all the code necessary to build this button tap counter app. Less than 100 lines of code, not counting the comments, to generate an iOS & Android app. If down the road you wanted to build native code into your app you can and with ease. I won’t get into that now. There’s one more part to my sales pitch about using Flutter for your own project.
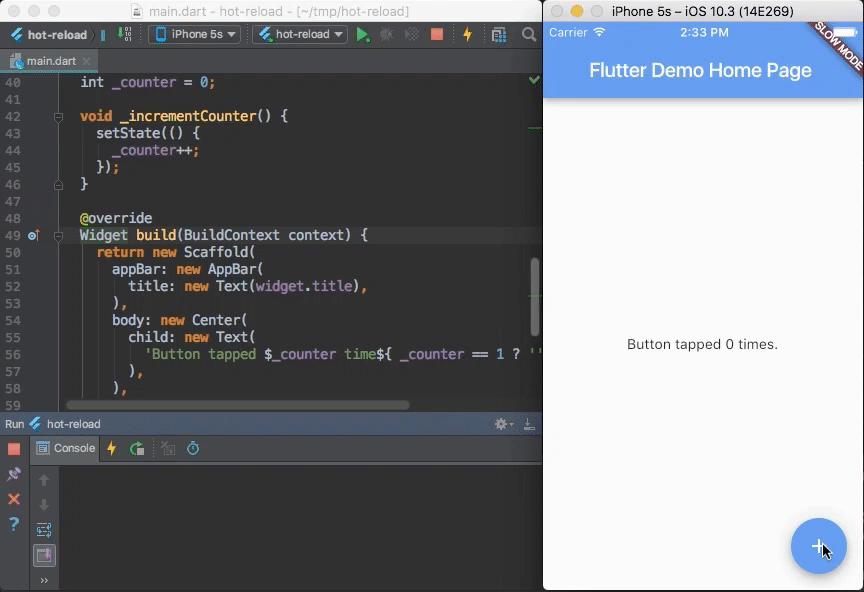
Faster development with Hot Reload
Earlier I mentioned one of the neat things about Flutter was the way UIs were updated. How state changes cause widgets to be rebuilt and the differences are applied to the UI. If you have been doing Android development recently you might be familiar with the concept of hot reload. Flutter allows you to hot reload iOS apps. Here it is in action.
TL;DR
Flutter allows you to write iOS & Android apps with Dart. It may take a bit of learning to get used to coding in Dart if you haven’t done so yet but the concepts are pretty simple once you get the concept of widgets, stateful vs. stateless. One codebase to build two apps for different platforms is pretty powerful. In less than a minute you can create your first Flutter app and it’s definitely worth checking out. I’m looking forward to using it on a future project. Stay tuned.
As always, I hope this helps. If you’ve got any questions reach out to me on Twitter, Facebook or in the comments below.